How do I create a discount plan and restrict by Availability, Occupancy, or Unit Types?

Discount plans can be used to give tenants free months, a discount off one month, a permanent discount and more. You can specify when to apply the discount such as only applying to specific unit types, or only under certain occupancy thresholds.
To create a discount plan, first navigate to Setup in SiteLink Web Edition.

Then click Discount Plans.
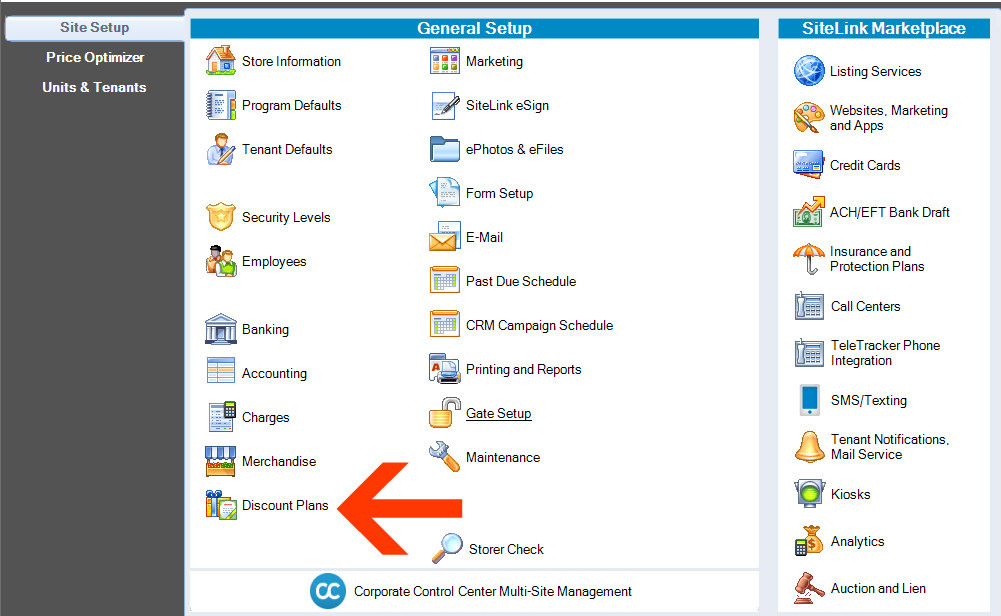
Click Add on the right.

Fill out each section below:
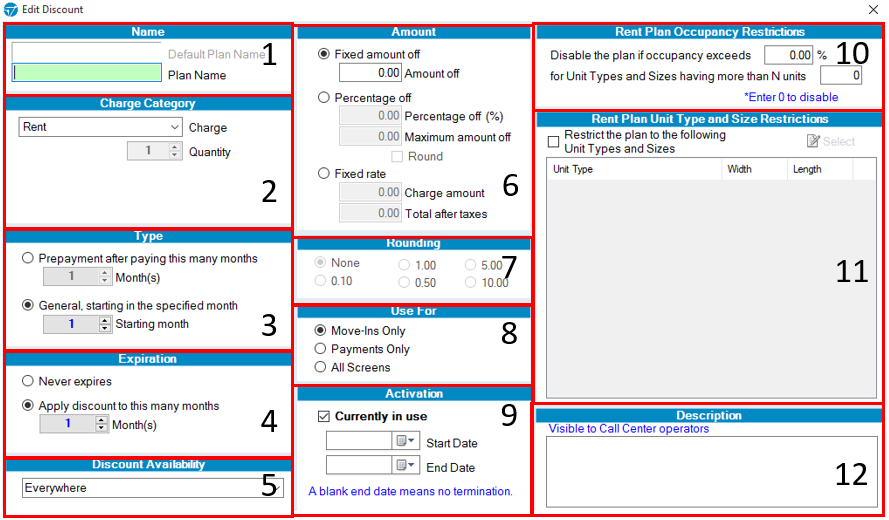
1. Plan Name
This is how the discount will be displayed in SiteLink when you select a discount plan to apply. If you show discount plans on your website, this name will be displayed to customers as well.
Default Plan Name will be automatically filled in when viewing a discount plan that came with SiteLink (Ex: $10 Coupon). Otherwise, this field is not editable.
2. Charge Category
You can select which type of charge to apply the discount to such as rent, admin fee, etc. The list you can choose from contains the charges that you have set up in Setup > Charges.
The Quantity option lets you choose a quantity of items to apply the discount to. For example, for a promotion of 10% off 10 boxes, you would enter 10 in the quantity field.
3. Type
The Type option lets you choose how the discount is applied. There are two different options:
Prepayment – You can choose for the customer to be required to pay in full in order for the discount to apply. This is used mainly for discounts such as pay 12 months get 1 free.
General – You can use this option to apply the discount without requiring upfront prepayment. For example, discounts such as 50% off the First Month, a $1 Move-in special or 20% off 3 months would start in month one. 2nd month free would start in month 2.
4. Expiration
Expiration lets you decide how long the discount will last for. There are two different options:
Never Expire – The discount will set the tenant’s rate to a discounted rate based on the amount of the discount. For example: 10% off for military or senior citizens.
Apply Discount to this many months – This is usually used in plans that specify an amount of months that the discount will apply to. An example would be Pay 12 months, Get 1 Free. We would select 1 month here, as it is only 1 month that is getting100% off. The prepayment option (explained in #3) would be set as 6, because 6 months need to be paid before the free month is applied.
5. Discount Availability
This limits where the discount is available to be selected from. There are a number of options:
Everywhere
Call Center & Corporate Control only
Client and myHub
Kiosk Only
SpareFoot Only
Website only
The Everywhere option is the most recommended option, as it allows the discount to be available wherever your customer signs up from. However, for example, you may want to create an online special which is available on your website only.
6. Amount
The Amount section allows you to define how much your discount will be and how it will be calculated.
Fixed Amount – This allows you to take off a flat dollar amount from the price. This would be used in a discount such as $50 off your First Month, $25 coupon, or $25 off for a referral.
Percentage Off – This allows to you easily take off a percentage of the rent. For example, a 30% Permanent Discount. If you want to offer a free month, enter 100%.
Maximum Amount Off – This can be used to limit the amount the Percentage option will take off. You could make this a maximum of $200, so that a person with $500 rent would only get $200 off in a 50% discount.
Round – Select this checkbox in order to round the dollar amount of the discount when Percentage Off is selected (see #7 for more information).
Fixed Rate – Allows you to specify an exact rent amount for the specified months. This option is used in discounts like $1 Move In or can be used for Free Months by entering 0 as the rate.
7. Rounding
If the Round option was selected in the Percentage Off option in #6, you can choose how the discount amount will be rounded (nearest $.10, $5.00 etc). For example, if you are creating a discount for 13% off the first month’s rent, for a unit that costs $75, the discount amount will be $9.75. You may choose to round the discount to the nearest $1.00 so that the discount would be an even $10.
8. Use For
This option restricts where the discount plan can be applied within SiteLink. There are 3 options:
Move-Ins Only – The discount plan is only available to be applied when performing a move-in.
Payments Only – The discount plan is only available to be applied once the tenant has moved in and you are taking a payment from the Payments screen.
All Screens – Allows the discount plan to be applied at any time.
9. Activation
Activation lets you choose if the discount plan is only available during a certain time period. In order to activate the discount plan for use, check the box labeled “Currently in use”.
The start and end dates allow you to choose a period where the discount plan is available. For example, if you want to create a “Summertime Special”, you may set a start date of June 1st and an end date of August 31st. The discount will not be available outside of that time period.
10. Rent Plan Occupancy Restrictions
The Rent Plan Occupancy Restrictions lets you disable the discount plan for units that are over a certain percent occupancy and/or have a certain number of units.
For example, if you enter 90% in the field labeled “Disable plan if occupancy exceeds”, the discount would no longer be available if the unit group is over 90% full. If you enter a number in the “Restrict to Unit Types/Sizes with more than” field, the discount plan would only be available to unit groups with more than that number of units(total units). You can further restrict the specific units that the discount will apply to in the next step.
Entering “0” in each box will disable this feature.
11. Rent Plan Unit Type and Size Restrictions
You can specify unit types and sizes for the discount to apply to. Check the box in this section and then click Select. Check the boxes for the unit groups that you want the discount to be available for. All other units will be excluded from the discount. If no selection are made, the discount will be available for all unit groups.

Click Ok when you are done.
12. Description
Adding a description for the plan will show call center operators what the plan is about. You can put any information you want in here to make it clear what the discount plan offers.
Once you are done creating your discount, click OK in the bottom right to save it.
Categories
- All Categories
- 34 What's New
- 30 SiteLink: What's new
- 4 Storable Payments: What's new
- SiteLink Community Discussions
- 1.9K SiteLink General Discussions
- 95 SiteLink myHub
- 56 Lead to Lease
- 28 Price Optimization
- 38 SiteLink Certified Professional
- 267 How-To's
- 11 Gate setup and Access Control
- 6 Email setup and troubleshooting
- 2 Software Setup
- 2 Unit Setup
- 11 Basic Operations FAQs
- 14 Advanced Operations FAQs
- 18 Billing and Accounting
- 5 Troubleshooting
- 6 Reports
- 21 Storable Payments
- 98 Training Videos
- 7 Other Resources
- 64 SiteLink, SpareFoot & storEDGE merge
- Self-Storage Operations
- 73 Starting Out in Self-Storage
- 3 3rd Party Management
- 223 Regional Discussions
- 185 Miscellaneous Discussions
- 38 Industry Webinars
- SiteLink Marketplace
- 62 Self-Storage Website Design & Listing Services
- 31 Credit Cards & Payment Processing
- 32 Self-Storage Call Centers & Kiosks
- 48 Notifications, SMS & Phone Integrations
- 92 Self-Storage Insurance, Legal & Auctions
- 11 Self-Storage Revenue Management & Analytics
- 23 Gates & Access for Self-Storage Facilities
- 7 Ancillary Services for Self-Storage Facilites
- Self-Storage Times
- 64 News
- 32 Opinion
- 149 Lifestyle